SECTION 3: Playfield
Touching Up Playfield
The original playfield on this game was horrible. About half of it was worn to the bare wood. I was able to find a decent, albeit still flawed one, which I swapped out. This playfield stayed in the game as it was during the time that Tony had the game. When I got the game back from his family, I decided to touch up and clear coat the playfield.
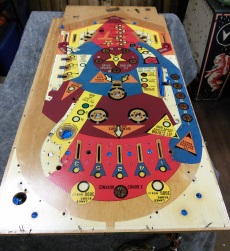
To be honest, I don't remember a lot about the playfield swap. I don't think it was as involved as my Harlem Globetrotters playfield swap. On the Globetrotters, I had a bare playfield and had to swap everything over. On this Supersonic, the playfield I found was completely wired so it was just a matter of changing them out. On the picture pages, you will see how bad the "new" playfield was. Just multiply that by 10 and you can imagine how bad the original playfield was. It was almost bare wood everywhere. I wish I would have taken a picture of it.
Clear-Coating the Playfield
In previous clear-coats I had used the Varathane brand Elite Diamond Finish extra gloss. Well, since my last clear-coat, Varathane had been bought out by Rustoleum and this is no longer available. They have a product that is supposed to be an equivalent called Varathane Interior Diamond Finish with the number 200081. My experieince with this new version was NOT as good as with the original. It didn't seem to have the same gloss as what I had used previously and it took a couple of extra coats. Now, it could be that I put it on using thinner layers this time as I didn't want to use too much with the new formulation. But it did require more coats to get the look I wanted. In the end, it still looks great.
The first step was to remove the mylar that was on the playfield. There were actually two layers in front of the slings, a single layer on the main playfield, and then rings around the bumpers. You can read in other places on this site how to use either the heat or freeze method. For me, I prefer the freeze method as it tends to cause less paint lifting. The only problem is that it leaves more glue residue to remove. The mylar removal went very quickly and didn't have any paint lifting. However, it left the most residue I have ever seen. I literally had to remove what felt like four layers of residue. I used a plastic scraper to continually remove layers of residue until I got down to the actual playfield. Due to the amount of residue it took me a week to get rid of it all. Note that I also used Goo-Gone and a heat gun to help soften the residue to help remove it. It seemed that I would get a "layer" removed only to realize there was more residue left.
To prepare the playfield, I removed everything from the top. I made a map of all of the posts, screws, wires, etc. for when I had to put it all back together later. I then taped off any component that was below the playfield that might get some of the clear coat on them. Stand up targets I just let hang below the playfield.
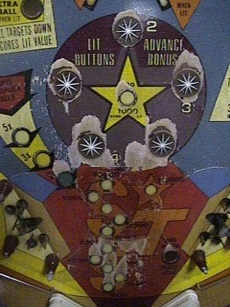
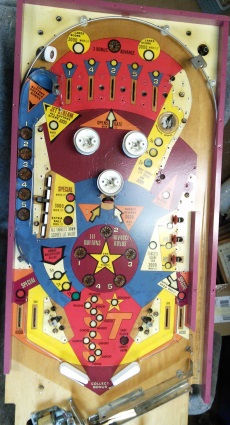
In touching up the playfield, this playfield had several large areas that needed painting and I should have invested in a cheap air brush system. But, I went ahead and brushed the paint on. This left a few brush marks and isn't quite as smooth as being sprayed on but it still looked ten times better than what I started with. The main red and purple areas had large areas that I touched up. See the picture pages for the before and after of the playfield.
To do the clear-coat, I wiped the playfield down with mineral spirits to make sure it was completely clean. I was then ready to apply the clear coat. It took 7-8 coats following the directions on the can. The can says that it may go on a little cloudy but that it will clear as it dries. I did very thin layers not allowing it to get cloudy. Once I saw any cloudiness, I stopped that layer. Just note that it looks better the more coats you add. The first coat is always the worst looking and the look improves with each subsequent coat. I did not sand between any of the coats. Some people do but with my thin layers I was afraid to do any sanding. The directions said to wait 24 hours between coats. So, each day for a little over a week I applied a new coat. Each coat was sprayed on by first covering the playfield in overlapping “passes” done lengthwise and then overlapping “passes” done widthwise. Each day the result looked better and better. The “lumpiness” disappeared after the third coat. I finished with eight coats. I then let it “cure” for about two weeks before installing anything on it.
In the end, the final product is much better than what I started with, but not quite as nice as some previous clear-coats I have done. In the end, I began to wonder if the new Rustoleum product had a "glossy" equivalent that would have been a bit more "shiny" than the one I used. It seemed that this product almost had a matte finish to it. Again, this is just my opinion of this product. It still looks good but next time I might try a different product.