Machine Statistics
Production Date: October 1979
Production Run: 6,643 units
Design: Ed Krynski
Artwork: Gordon Morison
The Game Synopsis/History
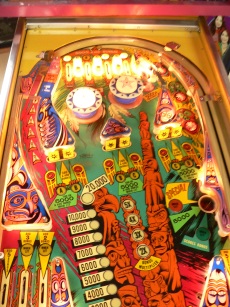
Totem was the tenth System 1 game produced by Gottlieb. It was the first System 1 game to use the 2nd generation multi-mode sound board. One of the unique features of the game are the asymmetrical flippers. The right flipper is set “higher” than the left flipper. My game has a mini-post between the flippers. Most games I have seen on the web do not have this post. I assume that this was a real drain-monster and that the owner/operator added the post to make the game more enjoyable. (When was the last time you heard of an operator doing that!) The game also has three sets of two drop-targets (a Gottlieb staple), a kick-out hole that is difficult to get the ball in, and a vari-target.
The game-play is typical of Gottlieb System 1 games. Other than the ability to have up to 5x bonus, there isn’t much in the game play that couldn’t be accomplished in an electro-mechanical game. The drop targets are “tied” to the A-B-C-D letters at the top of the playfield to earn the various bonus multiplier levels. The backglass on this game is considered to be one of the better Gottlieb entries. Rather than having a more cartoonish style as many of the previous games, it is more realistic. The American Indian motif is captured very well in the artwork and is what makes it a favorite among collectors.
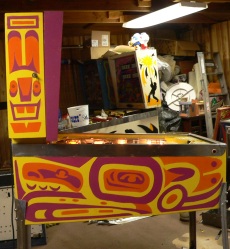
The Restoration
The cabinet on this game was in fairly good shape. One side had been scuffed up pretty badly so I decided to do a repaint. Gottlieb’s are a little more “complicated” to repaint due to the way the head frame is constructed and the webbing/splatter pattern used on the cabinet. Below are the details of this restoration.
SECTION 1: Electronics
There are two periods of work that I did to the electronics on this game. I've had the game for over ten years and initially I did the work in the First/Initial section below in order to get the game working. It worked for several years with the only issue being the intermittent issues with the sound board as described below. Even though the game was working, I let it sit without playing it for a year. When I booted the game back up, it would have random resets, inability to boot, etc. Most of these were due to the connectors needing to be re-pinned. I also decided to make the game more bullet proof by installing all new after market boards. This is described in the Second Round Fixes below.
First/Initial Fixes To Get The Game Working
As for the electronics, I cleaned up the MPU contacts and rebuilt the connector between the MPU and driver board. After this, everything worked except the sound board.
Problem #1: Connector between MPU and driver board. I “re-tinned” each of the edge connectors on the boards and rebuilt the connector between the CPU and the driver board.
Problem #2: Sound board did not work. It took over two years, but I finally found a working replacement board. I replaced the non-working board with the working one without a hitch. However, after a couple of weeks, the replacement sound board began making strange sounds after being on for ten minutes or more. I wasn’t sure if this was due to the 5 volts coming into the board not being consistent or if it was a component on the board. So, since it was a good idea to do it anyway, I replaced the C1 cap on the power supply board. Even if this wasn’t the issue with the sound board, it is a good idea to replace this. This didn’t fix the sound board.
Next, I replaced the C14 capacitor on the sound board. When this goes bad, it can cause the sounds to be flakey. This seemed to do the trick and fixed the sound issues. However, after some time, the high pitched sounds returned. Through a little trial and error, I discovered that the connector to the sound board was a little “loose” and after playing for a while the vibrations would cause it to lose connectivity. This caused a return signal to never get sent back to the MPU and created the problems on the sound board. By removing and reconnecting the sound board connector the problem would resolve itself. So, I re-tinned the pads to make the connector tighter. This fixed the sound issue for a while. After a few months, the problem returned. I just learned to live with it since it didn't affect gameplay but was only annoying.
Replaced C1 on the Power Supply. As stated above, this is a good thing to do anyway. The caps on these games are over 30 years old and if they aren't bad, they have to be close to drying out. So, I replaced it.
Ground Modifications. System 1 games had a few ground issues on the CPU and power supply. Basically, to fix this, you connect wires from the boards to the ground. John Robertson details the needed modifications on his Gottlieb site. So, I added an extra ground wire from the CPU, the power supply, and the driver board.
Vari-Target Did Not Always Score. Adjusted the target’s wiper arms and cleaned the ceramic “disc” with the metal points.
Second Round of Fixes to Bullet Proof the Game
Installed All New After Market Boards (CPU, DRIVER, POWER, SOUND)
I installed a new Ni-Wumph replacement MPU, a new after market Driver Board, a new after market power supply, and a new Flippp! Sound board. I did this to make the game bullet proof for sale. I was afraid that the original boards, due to their age, might fail not long after selling game and I didn't want whoever the new owner would be getting upset.
Replaced All Contacts in the Connectors
Connectors are the biggest headache and reason for System 1 failures and issues. My game was 41 years old and for some of the years I didn't own it was kept in a warehouse. So, the connectors finally had to be replaced. At first, I tried doing them without the Molex extraction tool. I thought I could get by without spending the $18 for the tiny piece of metal with a a handle on it. I was wrong. Other connector styles can be done with jewelers screwdrivers, but I found that the Gottlieb side connectors really do need the WAY OVER-PRICED specialty tool. I re-crimped all of the connectors in the game. Since I had all new boards, I didn't want the connectors to be the weak link.
Since installing the new boards and re-doing all of the connectors, the game has worked flawlessly.
Adjusted/Fixed Vari-Target
The Vari-Target was not always scoring at the various levels. Some of this could have been due to the connectors and the switch returns. But some was also due to the unit itself. I tightened the unit spring, adjusted the wiper arms, and put some silicon electric grease on the contacts to help the wiper arms move more freely and still work.