Section 2: Cabinet Continued
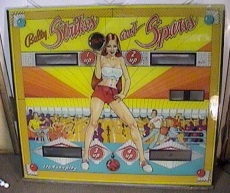
In painting this cabinet, I did one thing different from previous cabinet repaints. Normally, I do not prime the cabinet before painting it. However, because the colors being used were “light,” I decided to prime the cabinet with a light coat of flat Krylon white paint. I then painted the entire cabinet yellow/gold. Then I applied the white and then the orange.
In painting this cabinet, there were three problems I had. First, matching the yellow/gold was difficult. I finally ordered some paint from Krylon through the Sherwin Williams dealer that best matched the color. I went to the dealer and fortunately, the Krylon rep was there. He had a chart with all of the Krylon paint colors and types. So I was able to order a case directly from the factory.
The second problem took place on the left side of the head. I use the same stencil on both sides of the head. To do this, it requires flopping the stencil. So, I painted the right side first, which means that the stencil has paint on it. This painted side of the stencil then must lay against the left head when I use it on that side. In painting the left head, I didn’t let the white dry long enough before putting the orange stencil on top of it. As a result, where some of the weights which hold the stencil down were, it left flakes of orange paint on the white. The dried paint on the stencil was transferred to the “wet” white paint. So I had to retouch these areas. It was only a couple of spots, and the touch ups aren’t noticeable, but it was still a pain. Also, it is a reminder to not rush the job.
The third problem was some orange paint lifting. Krylon paint can be recoated at any time without lifting. I’ve always had great results with the old Krylon formual (before being bought out by Rustoleum) and I still think it is a good spray paint to use. The "old" formual had never lifted on me before so I think that I may have gotten a bad can of orange because some of the orange did lift. The lifting doesn’t look bad and I then sprayed it with a clearcoat to make sure it didn’t cause problems.
Again, when the cabinet was finished, I was amazed at how good it looked compared to what it looked like originally. There are those who prefer to have a totally original game even though it may have flaws and dings. This is a matter of preference, though. I still find that I like the look of the totally repainted cabinets. However, if the cabinet is not in too bad of shape, I wouldn’t repaint it, but this cabinet had several dings and definitely looks better having been repainted.
SECTION 3: Playfield
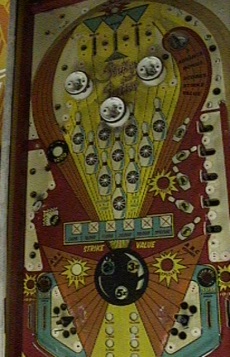
This playfield didn’t have a lot of wear. However, because it uses a lot of lighter colors such as yellow and orange, the infamous ball swirls are really noticeable. There were a couple of wear spots near the slingshots and the saucer that I was able to touch up. The color match was very good, but I couldn’t match the ball swirls;)
I completely tore down the playfield and did the following:- Installed new reproduction bumper caps
- Dry tumbled all metal parts
- Cleaned all plastic posts and light covers
- Cleaned and waxed the playfield
- Installed new rubber
- Installed new bumper bodies and skirts and put new coil sleeves on the bumpers and flippers.
SECTION 4: Backglass
The backglass on this game, unlike the cabinet, was almost perfect. There was no peeling, flaking, or problems with the paint. The only spot where paint is lost is where the locking bar hit the backglass. To protect the glass from future damage, I sealed the back of it using Krylon Triple thick. I taped off the score and credit windows and then applied two light coats in each direction. The lift channel did have quite a bit of rust. I was able to remove most of it using Eagle One Never Dull Chrome wadding.
SECTION 5: Miscellaneous
Besides the work mentioned under the Playfield section above, I also:
- I installed a new, three-pronged, heavy duty power cord.
- I polished all of the large metal areas with Never Dull.
- I polished the coin door with polishing compound and a drill.
- I put a new Bally sticker on the coin door. It's amazing the difference a new sticker makes.
- I repainted the legs gun metal gray.
- I repainted the lock down bar’s internal metal pieces chrome color.
- I put on new leg levelers. These really add a nice touch to a game.
- I put in a new coin door lock.
- A new ball was put in to minimize playfield wear.