Clear Coating the Playfield
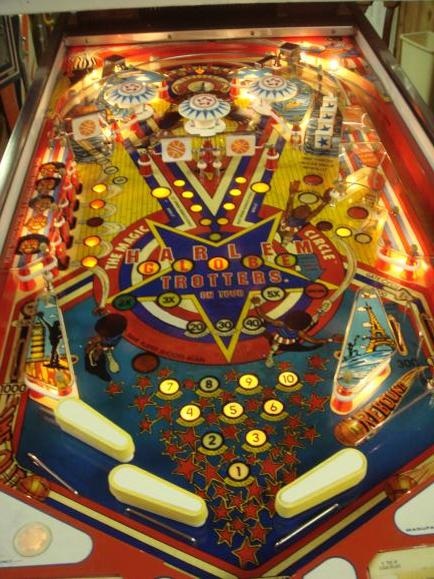
To clear coat the playfield, I did the following. First, I touched up the bare areas of the playfield using acrylic paints. I had my wife help me here as she is better (actually more patient) at getting a good color match. In touching up playfields I try to find colors that are as close a match as possible out of the bottle. I then experiment adding colors to create the match. It is basically trial and error. Also, often you will find what seems like a perfect match only to find that when it dries, it is a tad darker than the color you were trying to match. This is where the patience comes in. After being satisfied with the touch ups (they weren’t perfect, but they were acceptable to me), I made sure the playfield was clean. After cleaning with mineral spirits, it was ready to clear coat.
I used Varathane brand spray cans following the directions on the can. Basically, I spray 1 coat per day using about 5 or 6 coats. The first coat is always ugly. In fact, it is usually so “bumpy” that I think the paint is defective. However, as more coats are applied, the coats get smoother and clearer so that by the time I am finished, I am amazed at how good it looks. In spraying the coats, I hold the can 8-12 inches form the playfield and apply an even coat in the lengthwise direction and then again in the widthwise direction. I then let this dry for 24 hours before applying the second coat. I then do the same thing each day. personally, I do NOT sand between coats. some suggest using 1200 grit wed/dry sand paper, but I found that it isn’t necessary. Again, don’t worry if the first coat looks bad. Things will improve with subsequent coats. The number of coats to use is a matter of preference. I’ve found that it takes 5-6 coats to look the way I want.
After clear-coating, the playfield needs to cure several days before being subjected to wear and tear. Clay on his website suggests that it takes up to 35 days. The directions on the spray can don’t say that it takes that long, but it couldn’t hurt to wait if you needed to. In my case, since I still have several other things to do to the machine, it is usually at least a week and usually a month, before I am ready to play the game anyway. I made one goof on the clear coat. I had covered the lamp sockets and other below the playfield parts with masking tape to prevent the clear coat from getting on those part. On the “hole” where the right outlane ball gate was, a small piece of tape that was covering the hole had a small corner get on the playfield. When I pulled the tape off, I didn’t pay attention and it pulled up a small strip of clear near the gate. It doesn’t affect game play as the ball doesn’t roll over this section. If I had noticed this prior to pulling it up, I could have been more careful and prevented the problem. But in my haste I just “ripped” the tape off and since it was under the bottom layer of clear, it pull up a small section around the gate. Again, the ball doesn’t roll over this area so it doesn’t affect game play.
Finally, I re-install everything on the top side of the playfield. The most difficult part here is re-attaching the bumpers, slings, ball return solenoid, and flippers since they require work on both sides of the playfield. The bumper lamp leads are the most aggravating part to resolder. I still haven’t found an “easy” way to solder them.
New playfield Parts
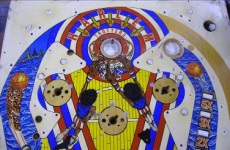
On the upper side of the playfield, I installed brand new bumper bodies, brand new bumper skirts, and brand new ring and rod assemblies. I then put new reproduction bumper caps on the bumpers. I also installed new reproduction drop targets for the in-line drop targets. Next, I refurbished the spinners. I re-created the design on the spinners in a desktop publishing program. I then sanded the spinners down to the bare metal. Next, I painted the spinners white. I printed the design on a clear sticker sheet and installed them on the spinners. On the original spinners, the design was only on one side. I decided to put it in both sides.