Section 2: Cabinet
This cabinet was pretty rough. It wasn’t as bad as my Flash Gordon, but nothing is. However, it did have a lot dings. It had a couple of large gouges in the rear and the bottom edges needed quite a bit of repair.
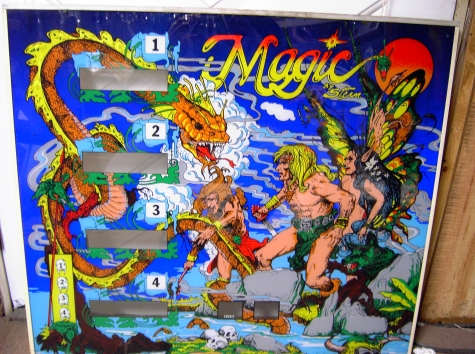
In restoring the cabinet, as usual, I made stencils of the designs on the head and sides. (Click here for a description of the process.) The cabinet had three colors. A deep blue was the base color, while white and orange were the applied colors. The design on the head was fairly simple, while the design on the sides of the cabinet was a little more detailed. Also, the original stencils were not aligned properly. So, I had to decide whether to try to recreate what they intended for the cabinet to look like (which would mean shifting some of the orange stencil around), or just leaving it as it was. I decided to leave things as they were for two reasons. First, it was simpler. Second, almost all original cabinets are misaligned to some degree. So, I figured that having mine off a little wouldn’t matter.
I made the stencils by first tracing the design onto tracing paper. I marked the white and orange sections appropriately on the paper. I then transferred this to clear acetate sheets. Fortunately, the designs on the head and sides were mirrored. Thus, I only needed to make six stencils, three white ones (front, head, side) and three orange ones (front, head, side). After painting one side, I could then flip the stencil over and use it on the other side. In cutting out the stencils, there is one thing I did differently this time. This cabinet has several white circles on it. I did not cut these out. It is difficult to cut a perfect circle. So, I just punched a hole in the center of these spots. This made it so that a spot of white paint would show up where the center of the circle was supposed to be. I then bought some circle templates from an art store and used these to paint the circles on the cabinet. This was a bit time consuming, but it made the paint job look a lot better than it would have been if I had tried to cut our the circles myself.
In preparing the cabinet, the first thing I did was to strip the old paint off. I used Citrus Strip. IMHO, this is the best stripper on the market. It works better than most strippers, and it is safe to use indoors. This Stern cabinet was different from any other cabinet I have ever stripped. Under the paint there was a layer of some kind of primer that would not strip off. On the cabinet, this was a yellow primer while on the head it was a dark blue.
After stripping the cabinet, I had to fix all of the imperfections, dents, dings, and carvings. I used both wood filler and Bondo for this process. The wood filler works great for the smaller imperfections and is easy to work with. Bondo is great for bigger dings. I also had to repair or rebuild some of the edges of the cabinet underneath. It seems that this is where a lot of cabinets take a beating. Basically, I would build a “form” that was the same width as the wood and then fill the form with Bondo. Afterwards I would sand it down to the level of the cabinet.
After fixing the dings and imperfections, I then sanded the cabinet with 150, 220, 320, and 400 grit sandpaper wiping it with mineral spirits in between sandings to remove the loose particles.
Next came the actual painting. I taped off the metal rails and other areas where I didn't want to get over spray. The base color was a dark blue. I almost always use Krylon paints, as they seem to work well and can be recoated any time. From the pictures, you can see that I lay the stencils on the cabinet and then use weights (old sockets) to hold it down to prevent underspray.
After applying the base blue, white was the second color. The white went on well without any problems, just a little underspray here and there, which is OK since most original cabinets had some underspray also.
Then came the orange. I made a mistake on the left side here. The right side, front, and head went on fine. However, I rushed the left side and it caused a minor problem. Here’s what happened.
The orange, in most places, is painted over white. However, there were a few places that it covers the blue (remember, the stencils do not overlay perfectly). The areas that cover the blue require extra coats of paint in order look the same as where it covers the white. Well, the proper way to do this is to put on a coat or two and then let it dry before adding additional coats. However, I tried to rush the process and put too many coats on at once and made the paint “too wet.” Well, this caused some of the paint to “pool” under a couple of the edges of the stencil. When I removed the stencil, these “pool” marks were noticeable. So, I had to touch these up. Some I touched up my masking the areas and repainting them. Others I touched up by hand. The areas aren’t that noticeable, but up close the left side isn’t as well done as the right side.
After all three colors were applied, I sprayed two to three coats of Krylon Crystal Clear to the whole machine.