Creating Stencils Continued
Trace the Design Onto Tracing Paper
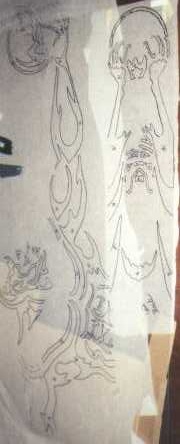
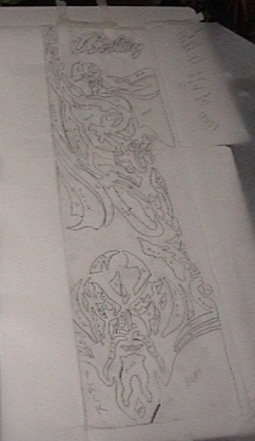 Here's a picture of the tracing for the head of my Flash Gordon. It has a very detailed design compared to many machines. The acetate sheet is placed on
top of the drawing and I will transfer one color to the sheet. After transferring that color, I will get another sheet and transfer the second color. On this design,
because of its detail, I used small fingernail scissors to cut out the stencil.
Here's a picture of the tracing for the head of my Flash Gordon. It has a very detailed design compared to many machines. The acetate sheet is placed on
top of the drawing and I will transfer one color to the sheet. After transferring that color, I will get another sheet and transfer the second color. On this design,
because of its detail, I used small fingernail scissors to cut out the stencil.
Once I know how many stencils I am making and have developed a gameplan for doing the repaint, I begin by taping tracing paper on the sides of the machine. Tracing paper can be bought in rolls at Hobby Lobby or any arts and crafts store. Besides the design, be sure to mark the side rails and the cabinet edges. When you trace the design do both colors on the same sheet of paper. This helps ensure that the two stencils for the different colors will "line up" better. I mark each "region" on the pattern with the appropriate color.
Transfer the Design from the tracing paper to the acetate sheets
After tracing the design onto the tracing paper, I transfer the design of each color to clear acetate sheets using a permanent marker so that it won't smear. Theoretically, you could just put the sheets on the cabinet and trace the design directly onto the acetate sheets, but I find it is better to do both colors on the paper first. The reason for this is that it is easier to be precise with a pencil on paper than with a marker on acetate. You can do it whichever way you want, but for me, the tracing paper to acetate works better than going straight to acetate.
I've been asked several times where I get the acetate sheets. You have two options. You can buy individual sheets or buy the acetate on a roll. The sheets come in large 40" X 24" sheets and can be found at most art stores. They comes in various thicknesses. Note that while thicker sheets cost more, they are easier to work with. For me, it is worth paying extra for the additional thickness. Personally, I buy the acetate on a 12' roll from Hobby Lobby. The roll allows me to make a couple of side stencils as well as a couple for the head.
Next, I lay my tracing paper pattern onto my dining room table and place the acetate sheet on top of it. I transfer the pattern for each color onto the acetate sheet.
Test Your Tracing and Cut it Out
After marking the acetate sheets, I put them onto the cabinet to make sure that the design and the colors work out correctly. If it is OK, I then cut out the stencil. I use a combination of large scissors and the the small fingernail scissors for the areas that are very detailed. If the stencil requires that you have some free standing pieces, you need to measure and mark exactly where they will be placed. For example, the Flash Gordon required that I make a star shape that was free standing to cover the red when the black was applied. I made a mark on some tape on the side rails to position the point of the star. I then measured the distance from the rail to the point and wrote this down. I also did this to two other points to make sure that the positioning was correct.
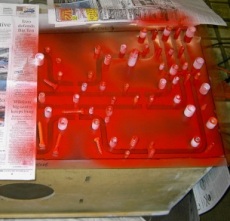
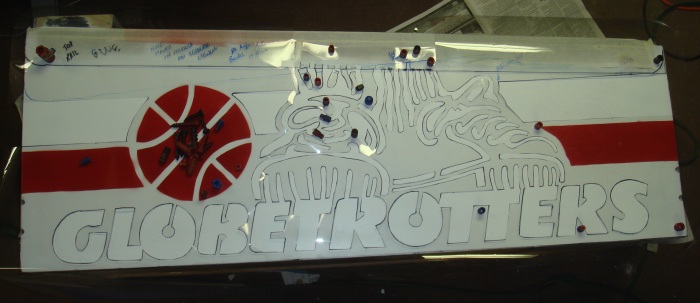 Here's a picture of the blue stencil from My Harlem Globetrotters. Note the old sockets I use as weights to hold the edges of the stencil down to prevent underspray. Note
that the areas just below the railing have the greatest probability for underspray. At times I cut the stencil here and then slide the edge under the railing.
Here's a picture of the blue stencil from My Harlem Globetrotters. Note the old sockets I use as weights to hold the edges of the stencil down to prevent underspray. Note
that the areas just below the railing have the greatest probability for underspray. At times I cut the stencil here and then slide the edge under the railing.
Store Your Stencils Flat
Once you are confident that the stencils are good, then do your best to store them on a flat surface until you are ready to use them. I usually lay them on another pinball machine and then cover them with with books to help keep them flat. You are now ready to strip, repair, and repaint the cabinet.
One word on the acetate sheets. On some of the edges, it is easy to get "underspray" due to the fact that they are light. This is especially true when "flipping" a sheet after one side has been painted as the sheet tends to curl a little on the edges due to the paint. I use rocks and other metal weights to make the stencil lie down flat and prevent underspray. The website has some pictures of this to demonstrate.